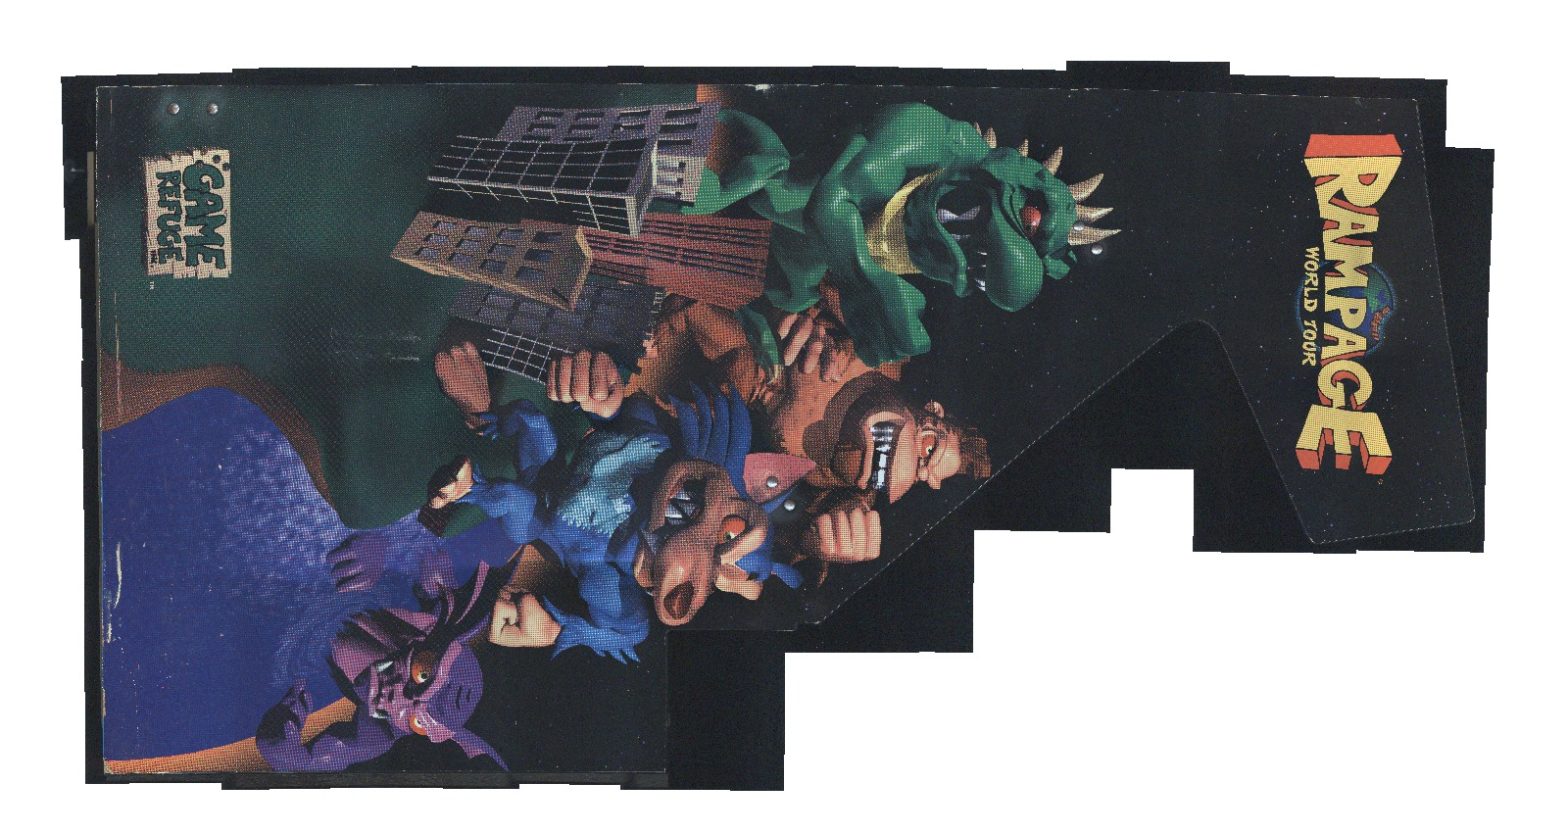
Prompted by someone requesting some artwork for Rampage World Tour, I decided to take a stab at scanning side art properly. I had attempted this once before, but my scanner failed halfway through one side, and I just kind of forgot about it.
Rampage World Tour is not a particularly collectable game at this point in time. It probably never will be – it was released in 1997, when arcades were already on their downward descent in popularity, and it wasn’t particularly groundbreaking. It is quite a fun party game, though – it’s a no-brainer to pick up, it’s very satisfying to bring down a building by punching and kicking it, and Cleveland happens to be one of the earlier cities you destroy. 🙂
Given its lack of popularity, there isn’t much information online about it. Before I scanned in my manual and contributed it to the Arcade Manual Archive, I couldn’t find any trace of the manual online. Same goes for artwork – there are a couple sites that sell some NOS pieces, like the marquee and the control panel overlay, but nobody selling the full (dedicated) side art.
Here’s the process I used:
- Tip the cabinet on its side. It probably would be best to take all the heavy stuff out of the cabinet before doing this, but I was feeling lazy and things were pretty secured.
- Lay a scanner on top of the cabinet, and keep something straight around to help you measure your progress.
- Set the scanner to scan at 600 dpi in TIF format: for some artwork, 300 dpi might be fine, but I’ve got tons of hard drive space, so I just did 600 dpi. I also set the exposure to a fixed amount, turned off color correction and every other fancy feature, and saved it as the default preset to save some time. I used the Windows Scan & Fax program, but others would probably work fine. It just happened to be on my laptop already.
- Take overlapping scans of the entire side art. This is important – you need to have about 20-30% overlap for stitching to be handled nicely, and also to eliminate “ghosting” at the edges of the scans. The more overlap, the more scans you’ll need to do, but it can save headaches in the long run.

After this, I had around 3.5 gigs worth of scans for just the left side. Yeow!
Putting the files together ended up being a lot more complicated than I thought. I suppose it’s possible to just use Photoshop to try and align all the files, but that seemed incredibly error-prone and time-consuming. Instead, I looked into using the free program Hugin to merge the files together. Hugin is great for stitching panoramic photos together, but it can also handle giant scans! It works a little differently than normal, though.
I started from this tutorial for Hugin, but found some things that were inconsistent/unnecessary. Here are some of my notes on its use:
- Leave the images unrotated – Hugin will detect what needs to be rolled around.
- Add all the images.
- Set the HFOV to 10.
- On the Images tab, I had to create control points between each pair of overlapping images (horizontal and vertical). Automatically doing this led to crashes because the images were huge (I scanned at 600 dpi). However, manually selecting two overlapping images (by holding down the Ctrl or Cmd key while clicking on them), then clicking the Create control points button, I was able to get a bunch of control points on adjacent images. I tried geting some on the diagonally overlapping images, but often these had trouble. Hugins CPFind, the default option, worked fine.
- I did not create separate lenses. This was described in the tutorial, but I found it to cause more problems.
- On the optimizer tab, I chose “custom,” and only adjusted roll (r), X and Y. I basically checked all the boxes except for a central image on those three parameters, then clicked Optimize.

- I opened the fast (opengl) preview, set “rectilinear projection” and adjusted things so that they were cropped to the extent of the images.
- On the Stitcher tab, I clicked “Calculate Optimal Size” to get the largest recommended file, checked the exposure corrected panorama output and the no exposure correction remapped images output options, and stiched.

The Windows version crashed when trying to blend all the images into one. I then switched to the Mac version, which also crashed, but got farther. Finally, I replaced enblend (inside the PTBatcherGui.app/Contents/MacOS folder) with the older version (0.4), set the memory size to 2 GB by setting the option “-m2048” in enblend’s parameters, and it worked! (Details: https://bugs.launchpad.net/hugin/+bug/814280)
Now I need to do some editing/cleanup. There are plenty of scratches, dust, hairs, imperfections, etc., and lord knows it’s hard working with a 1.3 gigapixel file in Photoshop when you only have 4 GB of RAM…

FYI: the full version of this image (by clicking on it) is still only 3.3% as wide/tall as the actual scan.
Update 2011-11-03: I noticed the version above was kind of wobbly. I set some horizontal control points along the top and bottom edges, and some vertical ones along the left edge, and that made things a lot better.
Update 2013-06-03: I ended up scanning the other side, along with some additional artwork, and finally posted everything online here: http://www.mediafire.com/folder/xh0s6yz2w7wxd/Rampage_World_Tour_300_DPI_Scans
Can I help you to restore this artwork?
I´m Mikonos, a arcade photoshoper. I´m a member of Mr. Do Arcade. Recently I posted some new bezels restored there.
Please check it and know me through google: Mikonos+Arcade or Mikonos+artworks (google images).
Regards
I would love some help/pointers for things to do! I’m an experienced user of Photoshop for design/layout, though I have no experience working with files this huge. Someone suggested that I resample to 300 dpi to make the work more manageable – would you agree with that recommendation? Do you have any suggestions for getting rid or maintaining the screen pattern while doing work to eliminate scratches/smudges and correct colors?
Thanks for sharing your hard work.