(For background info, check out part 1, part 2, part 3, and part 4)
I was definitely intimidated by the side art. It’s basically a giant sticker for each side – a giant, expensive sticker. I don’t exactly have the best track record with stickers.
The only other side art I’ve applied was for a Donkey Kong cab that I partially restored last year, but DK’s art is just a small portion of the side of the cabinet. Getting an entire sticker lined up is another beast, not to mention the ridiculous amount of overlap.
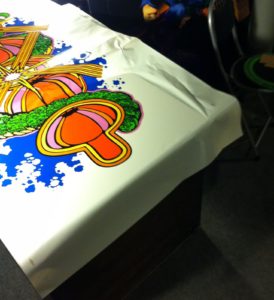
Step 1 was getting the sticker lined up on the side of the cab. I had decided beforehand that the right side when facing the cabinet head on would be the “showcase” side (visible when walking into my basement), so I started with the left side in case I made any mistakes. I laid the cabinet down on its side to make it easier to adjust.
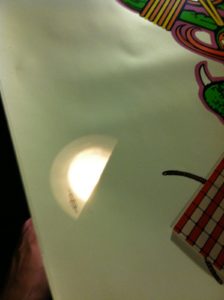
This particular art from Phoenix Arcade doesn’t leave much room for horizontal alignment error – there was less than a 1/4″ of overlap on the sides. Vertically there was a lot of slack, but it wasn’t hard to figure out a spot that looked good, with the centipede antennae working their way up the side of the cabinet. One thing that I noted was the position of some registration marks, which obviously shouldn’t be visible in the cab – I used one of the registration marks as a guide for the vertical positioning. Here’s a shot with a light behind the sticker showing the registration mark positioning relative to the “hood” of the cab (viewed from the “top” of the cabinet):
I set up some utility lights on either side to help me find creases/ripples, laid some heavy things down on the artwork to fix it in place, and then proceeded to remove the sticker backing from the bottom and fix it to the cab. Here’s where I made several mistakes:
- I should have actually taped the artwork to the cabinet.
- I should have pre-trimmed away some of the sticker where there was no cabinet behind it. The sticker is a giant rectangle, but that isn’t the shape of the cab.
- I should have cut away the backing from my starting point. Not all of it, but enough that I could lay the entire sticker flat as I was stretching it out.
I had a false start thanks to my missteps above – I ended up getting a few inches applied, and realized that it was slightly crooked. Thankfully I was able to remove that bit and reapply, but the bottom is a bit ripply as a result.
I used Bondo spreaders to work out the creases as I went. Here’s where I made yet another mistake. I sometimes encountered bubbles after I had moved past a section, and foolishly decided that I should push really hard with the spreader to get the bubbles to the edges. Bad idea. This caused some ugly ripples in the vinyl itself. I don’t have any pictures of this (I am too ashamed), but I’m just glad it happened on the non-showcase side.
The technique I read about after the fact was to use a very tiny pin to prick a hole where the bubble is (preferably where there is a line or other shape to hide the pinprick. This worked muuuuch better for bubbles noticed after the fact. Of course, best of all is avoiding bubbles in the first place!
One other problem I encountered with this side was the registration mark. Thanks to my poor application skills, the mark inched upward and ended up being on a visible part of the cab! I cut a sliver of white off of the overhanging part of the sticker, though, and just covered up the registration mark with it – you can barely notice it now.
I cut around the edges, leaving about 1/4″ overlap all around to tuck under the t-molding. Then after sleeping on it and reading about better techniques, I flipped the cabinet over and tackled the good side.
For this side, I employed the techniques described above: I use painter’s tape to secure the side art. I pulled back a “starter” at the bottom, cut away the backing, and laid it down very carefully. From this point forward I just pulled the backing out from under everything, but thanks to getting started correctly it pretty much held its position.The top rear corner had a sliver that was not covered, but as before, I just cut a sliver out from the leftover sticker and used that to fill in the gap.
Stickers applied! It was now time to start putting the machine back together.
Concluded in part 6.

